Where to Put Security Cameras at Home
Your home is unique, so no single security camera placement will work for everyone. However this guide helps you consider all the aspects of your property and identify which ones are absolute musts based on vulnerabilities and probability.
With the security of physical places, objects and persons, any measure for or against it are irrevocably subject to 3 laws; force, effort and time.
When it comes to your home’s security, there is no one-size fits all policy. The layout and budget of the property will affect where you place cameras in order for them be effective at deterring criminals from targeting this area or not. I’ve identified some key considerations that should help guide you through installing a system.

Where to Put Security Cameras at Home:
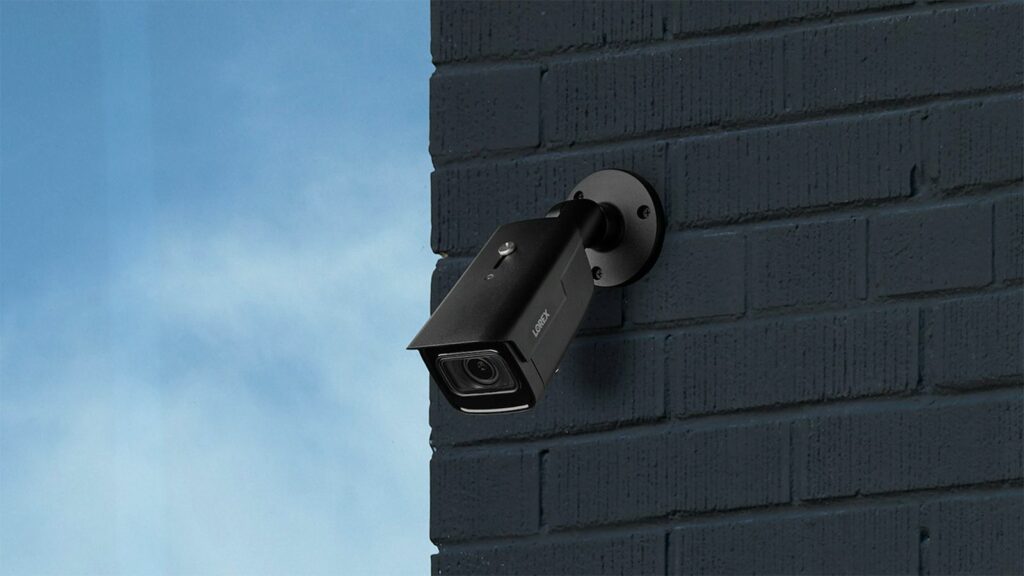
Main Entrance Front Door
The most obvious and generally most important place to put a security camera. The front door is often where burglars strike, so it’s important to have a security camera installed. A good option for homeowners with kids or pets who need quick access into the home without having strangers enter through an entranceway way off campus – like your garage. Security video doorbells which can be used as both primary monitors and backups when linked up wirelessly via WiFI cameras placed at strategic spots around house such that they always capture footage of people coming in and going out.
Driveway
Keep an eye on your garage and driveway as this will be the primary way an intruder or anyone else to approach your home. You can also monitor whether or not anyone approaches from outside by checking for cars coming upending down their driveway before entering into yours. Don’t let anyone get too close without knowing about it first because there may be other ways they’re trying to break in like picking or already unlocked doors. Conveniently, this will probably the most used camera for non-criminal purposes, just to see who comes to your door, like deliveries.
Secondary Entry Doors
Back doors, side doors and other exterior doors can provide am intruder with an easy way into your home undetected. To ensure full knowledge of everyone who enters and leaves, it’s important to add cameras at secondary locations like doorways or basement windows where you might expect criminals would attempt entering unnoticed; especially if one is used more often than others.
Backyard
The installation of a security camera in your backyard will give you peace-of mind when it comes to knowing what’s going on outside. We tend to focus on the front exterior of our homes for potential intruders while neglecting the back, which is not surprising but if installing multiple cameras, the backyard is a must. Whether they’re people or animals that shouldn’t be there, the footage can help identify who has entered into prohibited areas.
Living Room
This place is also often connected or is part of the kitchen and dining room, the busiest parts of the home. So it’s ideal to put a camera or two in this area. Not only for security but to keep an eye on the many things that go on here. It could be pets while you’re away, the kids playing, a babysitter to monitor etc. It’s also particularly important if your living room has large sliding doors that lead outside, as this is a major vulnerability point.

Main Hallway
Installing a security cameras in a “bottle neck” area is vital. A main hallway where you must go through to get around the house is extremely strategic. If someone breaks into a bathroom or bedroom without being detected by another camera it will still show them moving around inside of our house. If an intruder is clever and intentionally manages to avoid all the exterior cameras, they may not be able to avoid this surprising one.
Bedrooms
For privacy and comfort reasons, you generally shouldn’t put security cameras in bedrooms. There are exceptions such as baby rooms, pet rooms and for disabled children. Alternately, adding a camera in a large walk-in closet could be beneficial if you have valuables in there – having it activate upon motion detection.


![“Survival in any form for any environment is an act of prevention and or recovery, best enacted by preparation.” -Det V Cader The problem with survival prepping is the assumption that you’ll be home when the SHTF, if not then it was all for nothing. This is the solution: Standard “prepping” is the practice of stockpiling pertinent supplies and the training of survival techniques to be used for a possible lifestyle altering, large-scale catastrophe or SHTF event. The typical process is simple; slowly but consistently acquire food, water, weapons and other relevant equipment and store them in a singular central location such as a home or private “bomb” shelter. Just as important but far less utilized is the ongoing learning and practice of survival, defense and use of the prepped equipment. Having everything in one location has one fatal flaw, however. It assumes that you will be at that very location at all times or it will always be easily accessible and nearby to your present location. There’s no way of knowing when or where an “event” will take place. Meaning getting to your home base where all your survival prepping is stored may be impossible due to the nature of an “event”; mass gridlock traffic, land / infrastructure destruction, social panic and violence, restrictive martial law, vicinity containment, active combat / hot zones and public transportation collapse. The average person commutes to work or school 5 days a week far enough that they need to take motorized transportation, public or private. Then there’s leisure, recreation and errands time at other homes and facilities as well as being away on vacation. So all that survival prepping, across town or half way around the world can be lost or seized by another. For more than a decade I’ve been doing the “vagabond survival prepping method” of which evolved from stashing small city-specific go-bags around the world as part of my former operative profession. It wasn’t about survival back then but about professional utility and function. Equipment that wasn’t ideal to equip on my person at all times because of unnecessary baggage or non-permissive locales. As time went by and the more I returned to some of these “prepped cities”, the go-bags that were already stashed became better equipped and for more dynamic use such as urban / wilderness survival. To this day, I manage these hidden go-bags whenever I happen to be in their respective countries. That’s my way of survival prepping while vagabonding. These are located in a growing number of the cities I frequently visit in secure but relatively easily accessible spots such as; under a boulder access in New York’s Central Park, inside a tree stump in the Amazon Jungle and a derelict manhole in Bangkok – all of which have been my active stash spots for years. Unlike typical at-home-preppers, I don’t have the luxury of a long term address so I can’t hand pick the exact items I want off the internet to ship to. But this works out for me just fine as I build / upgrade my kits with readily available materials from the city I’m in. So if an “event” does take place (which will often affect major cities first and most), I’ll have my prep kit close by no matter where I am in the world. Instead of having to rely on a singular base a continent away. Due to the limited opportunity but unlimited variety of goods available while constantly traveling, each go-bag is completely different. Some by design and others by necessity. All are sealed to protect from the elements and hidden but easily “accessible”. Various Kit Items List: Backpack, Duffle Bag or Dry Bag MRE’s, Canned Foods and Vitamins Bottled Water and Energy Shot Water Treatment Tablets Prescription Contact Lenses Kevlar Vest or Shield Climbing Rope and Gear Euros and US Dollars Gold and Platinum Bullion Urban / SERE Kit Wilderness Kit First Aid / Trauma Kit SD Card w/ Data Smartphone Gas Mask Knife, Machete and other Weapons CB and Two-Way Radio Full Change of Clothes Multi Tool and Pry Bar Flashlight and Chemlights Sleeping Bag or Parka Solar Charger Some may consider renting a locker in a facility like train stations or self storage units. It’s not easy to maintain them for years at a time when you’re not even in the country for years at a time. Also, when considering an “event”, it’s logical to expect the loss of power grid and the mayhem in busy public areas. It’s best to stash them where no one will look in an area that won’t be too hectic but not where it will be too difficult to reach with limited transportation options. The vagabond survival prepping method isn’t limited to location independents and nomads, however. Consider your travel requirements of daily life and stash a go-bag in strategic spots accordingly; in your car, near your job, somewhere between your home and work, a friend’s place and near a hangout you frequent. Survival prepping doesn’t end with the acquisition of supplies and equipment, it only begins there and continues on with honing skills to survive and thrive. [OPTICS : Triple Aught Design Pack]](https://myhealthynews.com/wp-content/uploads/sites/2/2022/12/Vagabond-Survival-Prepping-FAST-Pack-Litespeed-1-490x550.jpeg)

